Have you ever wondered how weather forecasts are created? With a robust weather API from Tomorrow.io you can utilize advanced AI and proprietary forecasting models to provide highly accurate weather data that serves as the foundation of a weather app.
Using Tomorrow.io’s weather API, it’s easy to create a weather data app using the R programming language. R is the ideal language for this purpose because of its vast collection of packages and its aptitude for data analysis. In this article, we will walk you through the steps to create a weather data app by utilizing the Tomorrow.io weather API R package.
How to Set Up Your Developmental Environment With Tomorrow.io Weather API R Package
If you’re a developer working on mobile or web applications, you may have experience creating weather-related apps. But have you considered displaying weather forecasts with statistical analysis and plotting? In this post, we’ll explore how to achieve this using the Tomorrow.io weather API, which provides us with highly precise weather data.
Before delving into our weather data app development, let’s prepare our development environment. This guide focuses on using R, a popular programming language for statistical computing and graphics.
To follow along, ensure that you have R and R-Studio installed on your machine.
We’ll use several R packages to help us achieve our goal – just illustrations, not an endorsement. Here’s a brief rundown:
- Githubinstall: This aids developers in installing R packages hosted on GitHub.
- Httr: An essential tool for working with HTTP, allowing us to make requests and handle responses.
- Rtomorrow.io: This is a wrapper for the Tomorrow.io API, facilitating our interaction with the API.
- Ggplot2: A powerful library that deals with data visualizations.
Once you’ve installed these packages, the next step is to get your unique API key from Tomorrow.io. This key authenticates your requests and allows you to access the weather data. Remember to securely store and access your secret key in the R application.
Once you get your unique API key from Tomorrow.io, you can store and access your secret key in the R application using this code sample:
#need to have an API for the authentication on Tomorrow API.
Sys.setenv(TOMORROW_API = "")
#in order to access the API key later this the way to do it print
(Sys.getenv("TOMORROW_API"))
How To Get Your Current Location for the API
Geolocation services use your device’s GPS and other location technologies to determine your current geographical location accurately. Most web browsers, including Google Chrome, Mozilla Firefox, and Microsoft Edge, support geolocation services. These services use the W3C Geolocation API, which is accessible through JavaScript code.
To get your current location using the Geolocation API, we first need to check if your browser supports geolocation services.
We can do this by using the `navigator.geolocation` object and checking if it’s not null.
```

function error() {

// Unable to get the current location

}

```
Once we have confirmed that your browser supports geolocation services, we can use the Geolocation API to retrieve your current location. We do this by calling the `getCurrentPosition()` method on the `navigator.geolocation` object.
The `getCurrentPosition()` method takes two parameters: `success` and `error`. The `success` parameter is a callback function that will be called if the API call is successful. It returns an object with your device’s current latitude and longitude.
On the other hand, the `error` parameter is also a callback function that will be called if the Geolocation API call fails.
You can also do this with R package.
- Install myip is an R package tool that determines your public IP address. You can install it using this command in the console: githubinstall::gh_install_packages(“myip”).
- Use the httr library and request http://ip-api.com/ to get the coordinates.
- Once you have these values ready, you will need to pass these as an argument to the Tomorrow functions. This will be done in a later section.
See the sample code below:
library(myip) #github package

library(stringr) #string library

library(httr) #httr library

#get our current IP address

ip <- substr(toString(myip("random")[1]),start =15, stop=28)

#uncomment if you want to see your ip-address

#print(ip)

#get our coordinates

url <- gsub(" ","", paste('http://ip-api.com/json/',ip, "?fields=lat,lon"))

#store the results

result <- GET(url)

#store results as parsed

json <- content(result,as="parsed")

#uncomment if you want to see your coordinates

#print(json[1])

#print(json[2])
Once we have retrieved your device’s current latitude and longitude, we can use this information to retrieve the weather data for your location through the Tomorrow.io Weather API’s R package.
How To Use the Tomorrow.io Weather API and R Package
In this section, you need to pass the data that you prepared from the previous code samples, which requires invoking one of the Tomorrow.io wrapper API functions and, in this example, we’re going to use the tomorrow.io_temperature method.
Let us see the example below before we go into the code details.
library(myip) #github package
library(stringr) #string library
library(httr) #httr library
library(Rtomorrow.io) #tomorrow.io API wrapper library
library(lubridate) #date library

#need to have an API for the authentication on Tomorrow.io API.
Sys.setenv(tomorrow.io_API = "aFK9oVioFuoSJ51CzXm45acAn8pDOfak")

#get our current IP address
ip <- substr(toString(myip("all")[1]),start =15, stop=28) #if 'random' doesn't work use 'all'

#get our coordinates
url <- gsub(" ","", paste('http://ip-api.com/json/',ip, "?fields=lat,lon"))

#store the results
result <- GET(url)

#store results as parsed
json <- content(result,as="parsed")

start_time <- lubridate::now()
end_time <- st + lubridate::days(15)

#for the argument of timestep 'current','1m','5m','15m','30m','1h','1d' are the only acceptable values.

weather_result <- Tomorrow.io_temperature(api_key = Sys.getenv("tomorrow.io_API"),
                                lat = as.numeric(json[1]),
                                long = as.numeric(json[2]),
                                timestep = '1d',
                                start_time = start_time,
                                end_time = end_time)
print(weather_result)
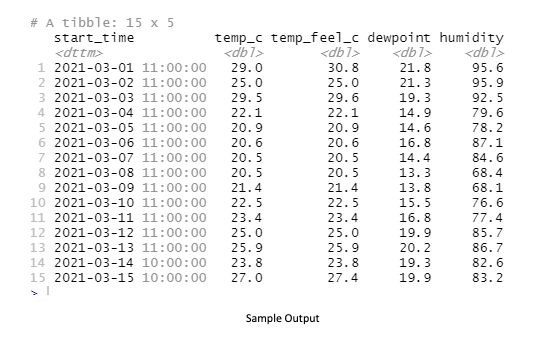
As you can see from the code sample above, we have passed the required arguments to the tomorrow.io_temperature method, like the time and coordinates and, of course, the API key. It is a straightforward method. However, the next challenge is how we can plot an image to make weather temperature forecasts.
But before that, please see the sample output below.
How to Use Tomorrow.io Weather API and R Package to Plot the Forecast Temperature
Before going even further, let me show the full code sample below.
library(myip) #github package
library(stringr) #string library
library(httr) #httr library
library(Rtomorrow.io) #Tomorrow API wrapper library
library(lubridate) #date library
library(ggplot2) #graph
library(hrbrthemes)#themes
library(extrafont)
loadfonts(device = "win")

#need to have an API for the authentication on Tomorrow API.
Sys.setenv(TOMORROW_API = "aFK9oVioFuoSJ51CzXm45acAn8pDOfak")

#get our current IP address
ip <- substr(toString(myip("all")[1]),start =15, stop=28) #if 'random' doesn't work use 'all'

#get our coordinates
url <- gsub(" ","", paste('http://ip-api.com/json/',ip, "?fields=lat,lon"))

#store the results
result <- GET(url)

#store results as parsed
json <- content(result,as="parsed")

start_time <- lubridate::now()
end_time <- st + lubridate::days(15)

#for the argument of timestep 'current','1m','5m','15m','30m','1h','1d' are the only acceptable values.

weather_result <- Tomorrow.io_temperature(api_key = Sys.getenv("tomorrow.io_API"),
                                lat = as.numeric(json[1]),
                                long = as.numeric(json[2]),
                                timestep = '1d',
                                start_time = start_time,
                                end_time = end_time)
glimpse(weather_result)

graph_result <- ggplot(data=weather_result, aes(x=start_time, y=humidity, group=1)) +
  geom_bar(stat = "identity", color="blue", fill="blue", width =5)+
  geom_line( color="#69b3a2", size=2, alpha=0.9, linetype=3) +
  scale_y_continuous("Humidity", sec.axis = sec_axis(~ . -30, name = "Temperature [°C]")) +
  theme(text=element_text(size=16,  family="serif")) +
  ggtitle("Weather Temperature for 15 days")

show(graph_result)
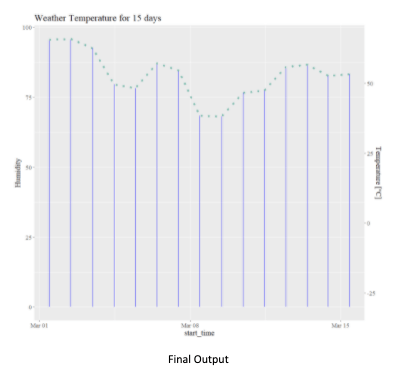
By setting the data, x- and y-axis values of the ggplot parameters from the weather_result, we have plotted the data given to us by the Tomorrow.io API forecast. Don’t forget the image results on your R Studio’s “Plots” tab.
Summary
Today, we have shown how to get started with Tomorrow.io’s API using the R language, and we have tried to demonstrate the following:
- Showed where to get your API key location via the dashboard.
- Get your current coordinates via a 3rd party Github package.
- Talk to Tomorrow.io’s API wrapper for R language to get the temperature.
- Showed how to plot the weather temperature forecasts using the R language.
In the future, using Tomorrow.io’s weather API can help you access current weather conditions and historical weather data to predict future weather temperatures, create weather reports, and visualize that information.
To learn more about Tomorrow.io’s weather API and the types of data you can collect, check out our extensive API documentation.